
RV/Boat PV system: How much solar power do you need?
Disclosure: Some of the links in this post are affiliate links.This means if you click on the link and purchase the item or sign up for services I trust and recommend, then I will receive a commission at no extra cost to you. Thanks.
So finally, after listening to others praise solar energy, and value its convenience in your case, or maybe after reading my post about things to know about solar power for RVs, you decided to go solar. Doing so is a great favor to the environment and getting more freedom on your travels.
I did some research and studied several books and articles, some of which you can find in the references section, to figure out how to design a stand-alone (off-grid) PV system. Then I tried to find out the less math-intensive but still accurate enough method, so everyone could follow.
The first step for designing a PV system is to understand how much energy do you need and how many solar panels you have to install to generate that power.
Before beginning, I should warn you that this estimation is not meant to be applied for off-grid houses or cabins. They will require other considerations and some small changes in their calculation process and that would be for another article.
We can find the PV system size by using one of the two equivalent methods of calculation:
For small PV systems like those on RVs or boats, the amp-hour is better if not necessary to help us design a more efficient system. And that because many of us choose a PWM (Pulse-Width Modulation) charge controller (regulator), for its lower price, instead of a MPPT (Maximum Power Point Tracking) model that could automatically regulates voltage and current of a PV panel and make it work at maximum performance. Besides, battery capacity is measured in A.h, so when we are going to decide our battery bank capacity, we need to know our required loads in amp-hour.
Well now, Iet’s see in 7 steps, how to calculate the amount of solar power and the minimum number of PV panels required for your RV/Boat.
Step 1: Determine daily Equivalent Sun Hours (ESH)
The amount of energy that a PV panel generates during a day, directly depends on how much solar irradiation (solar irradiance over a period of time) will hit the panel surface. Or simply said, how much sunlight you receive. As you already know, that depends on various factors such as: geo-location, weather conditions and seasonal changes.
To define the amount of energy received from the sun, the PV community adopted the term “equivalent sun”. An equivalent sun (a sun) is referred to the solar irradiance of 1000 W/m2 and it’s used as standard for rating a solar panel performance. This is the maximum amount of energy that could reach earth’s surface.
So at first, we need to find out the daily equivalent sun hours (ESH), sometimes called in a less accurate way as the peak sun hours.This parameter will help us to estimate the amount of energy that our PV panel could produce.
We can find the ESH for any location on earth, from solar irradiation (insolation) maps. U.S. State Solar Resource Maps and PVGIS tool from the European Commission Joint Research Centre are both good sources.
Some things that you should be careful of when you want to find out the daily ESH:
- Look out for the Global Horizontal Irradiation data. This is for when we consider our PV panels installed parallel to the ground and not tilted. So it’s much more appropriate for RVs or boats PV systems.
- Look for monthly maps instead of yearly data. Ask yourself in which period of the year you are going to use your RV/boat the most.
- Find the average daily ESH for a month in which your energy needs are the highest and solar irradiation is at its lowest. This way you can be sure that your system will not fail you.
- If the map just gives you the solar irradiation, you have to calculate the ESH for that month first, dividing by 1000 W.h/m2 (1 kW/m2), and then find the daily sun hours, dividing the result by the number of days.
For example in Turin (Torino), Italy, daily ESH in May, considering an average from several years, will be:
Horizontal irradiation in May = 156 kW.h/m2
ESH in May = 156 ÷ 1 kW/m2 (1 sun) = 156 h
ESH per day = 156 h ÷ 31 days = 5 h
Step 2: Find out your daily average energy usage in W.h
Knowing your energy consumption habits is a critical part for deciding the size of your off-grid PV system. The more accurate and realistic you are on determining your energy needs, the better, more reliable and cost-effective system you will get.
You can take one of these following approaches:
- The less accurate will be to look at how quickly your batteries are discharged. You will start with fully charged batteries and use them normally until they reach 50% (for lead-acid batteries) or 20% (for lithium-ion batteries) of their capacity. This way you will get a rough estimation of your daily usage. I don’t recommend this method. It could just be good for a quick first estimation.
- The second one is to install a battery monitor and then take the track of your daily electricity usage. This way you can see the energy consumption by different appliances. Be careful of the battery monitor type you choose. It must show the exact consumption and not just the charge percentages.
- And finally, you can calculate it by writing down all loads and appliances.
Regardless of the method you choose, it is necessary to distinguish between DC and AC loads. AC loads and DC loads that need different voltage from your system voltage will determine the size of the inverter when you are going to choose components for your system. (You can sum all the loads that going through the inverter or just take the ones that consume the most power. It is up to you. But, it would be more cost-effective if you choose just some loads that could function at the same time and not all at once).
Now, here are the things you should take note of:
- Make two separate lists for DC and AC appliances.
- Write the nominal wattage (W) of each device that you want to power with your RV/Boat PV system.
- Specify the average daily hours each item will be used.
- Multiply the number of hours by the rated wattage for each load and add them together, you will get your daily average power usage in W.h.
Be careful that this is the amount of energy that you consume. As we’ll see, the PV system energy requirement will be higher.
DC Load Quantity Nominal Voltage (V) Nominal Power (W) Daily Usage Hours (h) Daily Energy Requires (W.h) A 5 12 15 6 (5 x 15 x 6) 450 B 4 12 20 3 (4 x 20 x 3) 240 690
DC loads daily energy requirement
| DC Load | Quantity | Nominal Voltage (V) | Nominal Power (W) | Daily Usage Hours (h) | Daily Energy Requires (W.h) |
|---|---|---|---|---|---|
| A | 5 | 12 | 15 | 6 | (5 x 15 x 6) 450 |
| B | 4 | 12 | 20 | 3 | (4 x 20 x 3) 240 |
| 690 |
AC load Quantity Nominal Voltage (V) Nominal Power (W) Maximum Power (W) Daily Usage Hours (h) Daily Energy Requires (W.h) C 1 120 60 120 2 (1 x 60 x 2) 120 D 3 120 40 80 3 (3 x 40 x 3) 360 480
AC loads daily energy requirement
| AC load | Quantity | Nominal Voltage (V) | Nominal Power (W) | Maximum Power (W) | Daily Usage Hours (h) | Daily Energy Requires (W.h) |
|---|---|---|---|---|---|---|
| C | 1 | 120 | 60 | 120 | 2 | (1 x 60 x 2) 120 |
| D | 3 | 120 | 40 | 80 | 3 | (3 x 40 x 3) 360 |
| 480 |
By looking at this list, you can also decide whether to keep the appliances that consume too much power or to replace them with more efficient models.
The maximum power demand for AC loads is necessary when you are going to decide the size of your inverter.
If some appliances have yearly W.h rating instead of nominal wattage, you can easily calculate their daily energy requirement by dividing it by 365 (days of year).
Step 3: Decide the nominal voltage of the PV system
Before we should continue, it is necessary to decide our system voltage. System voltage is the nominal voltage at which the batteries, charge regulator and solar array operate.
Normally RV and boat batteries work at 12 V. So this is logical and more convenient to choose this value as nominal voltage. But if your PV system is going to be bigger than 1000 W, then you have to consider a higher nominal voltage. That because the bigger system means higher current (ampere, A) which will increase the costs of other components of your system, like cables and fuses, and will decrease the efficiency. Typical nominal voltages with load variation in a small PV system are 12 V and 24 V.
12 V system voltage up to 1000-1500 W
24 V system voltage up to 3000-4000 W
For getting the approximate wattage of your system, simply divide your daily average W.h found in step 2 by daily ESH. This way you have a rough estimation of the size (W) of your system. You can multiply the result by a size factor (SF) to take into account the system losses (SF normally will be between 1.1 to 1.4 depending on the system losses).
690 W.h + 480 W.h = 1170 W.h
1170 W.h ÷ 5 h (ESH) = 234 W
234 W × 1.3 (SF) = 304 W
In this example, our approximate PV system wattage is way below 1000 W. So we pick 12 V as nominal voltage.
Step 4: Convert your AC/DC energy requirement in A.h
The first method I want to show you is the amp-hour. So now it is time to convert the energy requirement found in step 2 in A.h.
We use the formula that relates the electric power (watts, W) with electric potential (volts, V) and electric current (amperes, A) for DC loads:
P = V I
- First we find the amp-hour for DC loads:
![]()
![]()
690 ÷ 12 = 57.5 A
- PV modules (PV panels) generate DC electricity. Therefore, we have to express the AC loads energy requirement in their DC equivalent. This is done simply by dividing it by inverter efficiency. I assume an inverter efficiency of 90% but you have to look at your inverter specification.
![]()
![]()
480 ÷ 0.90 = 533.3 W.h
![]()
![]()
533.3 ÷ 12 = 44.4 A.h
Step 5: Total energy requirement in A.h
Finally, we can find the total energy requirement in A.h, by adding system components (charge regulator, batteries, cables) losses of 20-30%.
![]()
![]()
Assuming system losses of 25% ⇒ (57.5 + 44.4) × 1.25 = 127.37 A.h
The term “energy requirement in A.h” refers to the required charge (A.h) for generating some amount of power (W) over a period of time.
Step 6: PV array current requirement
Now we are able to determine the current that our PV array has to generate:
![]()
![]()
127.37 ÷ 5 = 25,47 A
You can easily convert this number to find the power (W) required by the PV system:
⇒ 12 V x 25,47 A = 305.7 W
Step 7: Determine the best PV array layout
Now we have all the elements to decide how many PV panels we need and what is the best configuration to connect them. Solar panels can be connected in two ways to form an array:
- Series
- Parallel
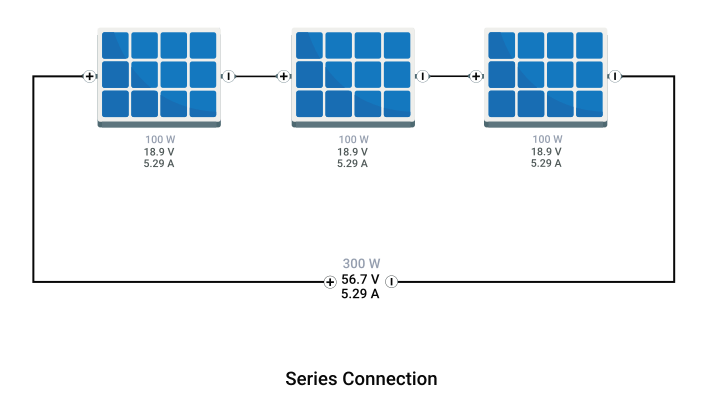
When we connect PV modules in series, the output voltage of the array will increase as the sum of the voltage of each panel, but the current will remain the same as a single PV panel.
Instead in a parallel connection, the output current of the array will increase as the sum of the current of each panel, but the voltage will remain the same as a single PV panel.
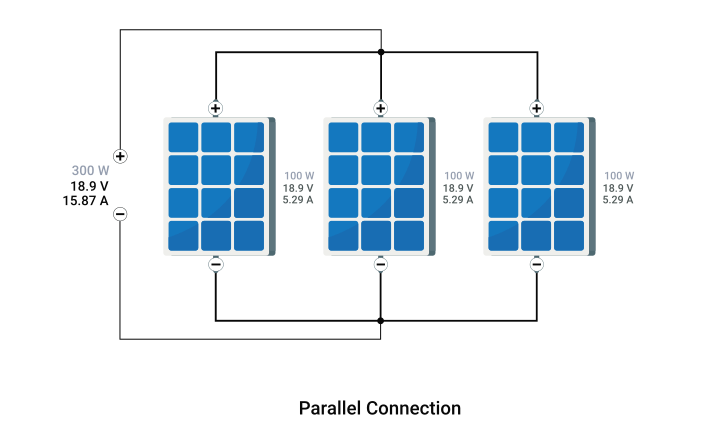
When possible, we prefer to connect PV panels in series. Higher voltage means lower current and consequently minor power losses.
An important thing to pay attention to when we connect the PV panels in different combinations is their compatibility. The current (A) of each panel connected in series and the voltage (V) of each string (panels connected in the series) connected in parallel, should be as similar as possible. Otherwise because of the mismatch effects in array, the PV system will produce less power.
I. PV array layout using amp-hour
You can find the required number of panels for a RV/boat PV system by using the formulas below:
![]()
![]()
![]()
![]()
![]()
![]()
Nominal voltage and Impp (Imp), the current produced at the maximum power point, are reported in the specification sheet of the PV module.
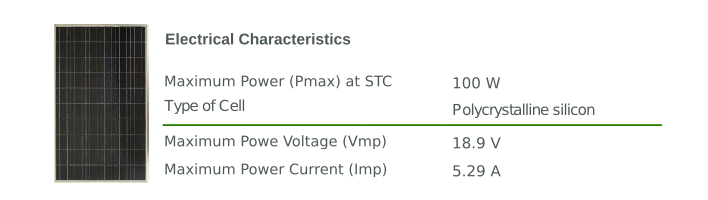
To give you an example, consider a 100 W, 12 V, polycrystalline panel with Imp= 5.29 A.
NP = 25.47 A ÷ 5.29 A = 4.8
NS = 12 V ÷ 12 V = 1
NT = 4.8 × 1 = 4.8
I will choose 5 panels connected in parallel for this system. For decimal numbers above 0.5, we have to consider adding another panel or selecting one with a higher power.
In this configuration, the rated power of our PV array will be 500 W. It might seem an exaggeration for our approximately 300 W needed power, which we found in step 3 and again in step 6. It is not! Because we did not include the effects of “real world” conditions on PV panels in our estimation. I recommend you to read my article about the performance rating of a solar panel, so you can get a better understanding of the PV panel performance that you are going to buy.
II. PV array layout using watt-hour
Lastly, if you are going to use a MPPT charge regulator, you can use the watt-hour method to find the number of panels and their configuration. The MPPT regulator performs better than PWM under any aspect. The only two reasons I can think of to buy a PWM regulator are that you are on a very restricted budget or your system is too small so it does not justify the cost.
![]()
![]()
The rated power of a PV panel is multiplied by 0.9 (10% losses) to give us a more realistic expectation of the module performance under operating conditions.
![]()
![]()
![]()
![]()
For our example we set our nominal system voltage (and consequently our battery bank voltage) at 24 V. Like as PV modules, we can connect batteries in series to get higher voltage. Using a 100 W rated PV panel with nominal 12 V, we will need:
NT = (234 W.h × 1.4) ÷ (100 W.h × 0.9) = 3,64 round up to 4
I will need 4 PV panels instead of 5, as we saw for amp-hour method. This is possible because the MPPT charge controller will optimize the energy output from PV modules.
NS = 24 V ÷ 12 V = 2
NP = 4 ÷ 2 = 2
As you can see, we have 2 sets of PV panels connected in series and we have to connect the two strings in parallel to form a block as the figure below.
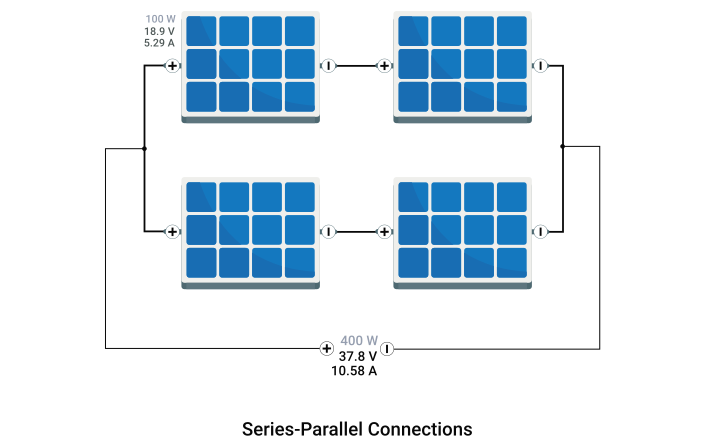
Using an MPPT charge controller will allow us to connect more panels in series as long as we respect the maximum permitted input voltage of it.
Maximum input voltage of MPPT charge controller ≥ Vmp x Ns
Vmp is the voltage of a PV module at maximum power point that could be found in its specifications sheet. In the case of a PWM charge controller, instead, the PV array voltage must match the system nominal voltage.
Conclusion
For having a more cost-effective photovoltaic system, you need to pay attention to your energy consumption. Adopting more environmentally friendly habits like using appliances that are less power-hungry, will improve your system efficiency. Also, in many cases, it could be more beneficial to have a small generator that could charge your batteries on the days of bad weather instead of totally relying on the system. If there is not any other source than your PV system to charge your batteries with, you should consider some “days of autonomy” for the system reliability. That will increase battery bank size and consequently the cost of your system. In the end, you can verify your design’s performance prevision using this performance tool. Remember to select the off-grid option. If you are not satisfied by the result, go back and modify your design.
References
[1] Smets, Arno & Jäger, Klaus & Isabella, Olindo & Van Swaaij, R.A.C.M.M. & Zeman, Miro. (2016). Solar Energy – The physics and engineering of photovoltaic conversion, technologies and systems.
[2] Hankins, M. (2010). Stand-alone solar electric systems : The earthscan expert handbook for planning, design and installation.
[3] Photovoltaics: System Design and Practice, First Edition. Heinrich Ha¨berlin. 2012 John Wiley & Sons, Ltd. Published 2012 by John Wiley & Sons, Ltd.
[4] Mohanty, Parimita & Karnamadakala, Rahul Sharma & Gujar, Mukesh & Kolhe, Mohan & Azmi, Aimie. (2015). PV System Design for Off-Grid Applications. 10.1007/978-3-319-14663-8_3.
[5] U.S. Department of Energy’s Office of Energy Efficiency and Renewable Energy.
[6] EU Science Hub.
[7] The National Renewable Energy Laboratory (NREL).
[8] The Union of Concerned Scientists.